!
version 11.2
no service udp-small-servers
no service tcp-small-servers
!
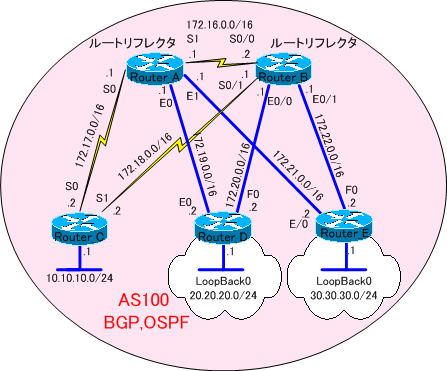
hostname Router_A
!
enable password cisco
!
ip subnet-zero
!
interface Ethernet0
ip address 172.19.0.1 255.255.0.0
!
interface Ethernet1
ip address 172.21.0.1 255.255.0.0
!
interface Serial0
ip address 172.17.0.1 255.255.0.0
!
interface Serial1
ip address 172.16.0.1 255.255.0.0
!
router ospf 1
network 0.0.0.0 255.255.255.255 area 0
!
router bgp 100
no synchronization
bgp cluster-id 1
neighbor 172.16.0.2 remote-as 100
neighbor 172.17.0.2 remote-as 100
neighbor 172.17.0.2 route-reflector-client
neighbor 172.19.0.2 remote-as 100
neighbor 172.19.0.2 route-reflector-client
neighbor 172.21.0.2 remote-as 100
neighbor 172.21.0.2 route-reflector-client
!
ip classless
!
line con 0
line aux 0
line vty 0 4
password cisco
login
!
end